Matrix keyboards are arranged such that the keys are in a matrix of rows and columns. This means that instead of needing a spare input for each key, one INPUT for each column and one OUTPUT for each row is all that’s needed.
In order to use the keyboard, we create a class of type MatrixKeyboardManager and configure it with an IoAbstractionRef, a KeyboardLayout that describes the keyboard attached (there are some standard ones already defined) and a listener that will be informed of changes. We also define a class extending from KeyboardListener to get the key events.
Not only does this work connected to Arduino pins, but you can connect your keyboard to any supported device such as an I2C PCF8574 or MCP23017. Both interrupt and polling operation are supported, you configure this in the call to initialise. Important Note - interrupt support is only available either on device pins or MCP23017 devices, it is unlikely to work on a PCF8574 as changing the outputs in the matrix raises an interrupt and therefore is potentially recursive.
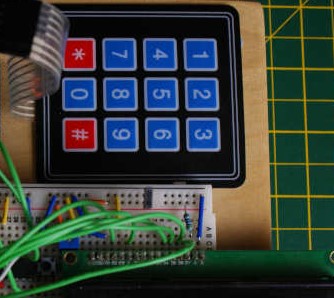
Wiring a matrix keyboard to an Arduino / embedded device
In order wire up a matrix keyboard, each row gets configured as an INPUT and is connected to an input capable pin, this pin should be pulled up with a 1K resistor too. Then, each column gets configured as OUTPUT and is wired to an output capable pin. Below is an example circuit, it shows how a matrix keyboard is both wired internally and also where the external resistors are needed. The library will actually set all inputs to INPUT_PULLUP, so for very short wire runs you may get away without the PULL-UP resistors shown in the circuit. You’ll need to test this yourself.
Choices:
- Connect directly to device pins, either interrupt based or polling.
- Connect using an MCP23017 I2C IO expander, either interrupt based or polling.
- Connect using a PCF8574 using polling.

Circuit showing 3 column by 4 row matrix keyboard
How matrix keyboard decoding works with this driver
Keyboard manager either polls the matrix many times a second for a change, or registers an interrupt that fires when there is a change. During the check, the code runs through the matrix, checking each column for an update. If a key press is detected for the first time, this starts the debounce cycle , which determines if a real key press has just occurred. Once that has been determined the keyPress event will be repeated until the key is released. At which point a final released event will be sent to the listener.
Creating a KeyboardListener
You need to extend from a class of type KeyboardListener in order to get key press events from the keyboard. An example of how to do this is shown below:
class MyKeyboardListener : public KeyboardListener {
public:
    void onKeyPressed(char key, bool held) {
        // do something when pressed
    }

    void onKeyReleased(char key) {
        // do something when released
    }
} myListener;
Initialise the keyboard
First you need to create a KeyboardLayout, to do this the easiest way is to use one the pre-canned ones for 3x4 and 4x4 displays.
// for a 3x4 numeric keypad
MAKE_KEYBOARD_LAYOUT_3X4(keyLayout)
// or for a 4x4 hex style keypad
MAKE_KEYBOARD_LAYOUT_4X4(keyLayout)
Alternatively you can create one from scratch by providing a KeyboardLayout
const char pgmLayout[] PROGMEM = "charsColByRow";
KeyboardLayout layout(rows, cols, const char* pgmLayout)
Before calling initialise on the MatrixKeyboardManager it is your responsibility to set the pins upon which the keyboard is attached.
keyboardLayout.setColPin(col, pin);
keyboardLayout.setRowPin(row, pin);
Lastly, initialise the keyboard passing an IoAbstractionRef indicating if pins or IoExpander are to be used:
// when you connect the device directly to arduino pins.
IoAbstractionRef arduinoIo = ioUsingArduino();

keyboard.initialise(arduinoIo, &keyLayout, &myListener, interruptDriven = false);
Lastly as the keyboard manager uses task manager, we must call it’s run loop frequently like below.
void loop() {
    // as this indirectly uses taskmanager, we must include this in loop.
    taskManager.runLoop();
}
And that’s it, you should now get called back when keys are pressed. There’s also a packaged example that you can take a look at.
Other pages within this category
- Timed blink - IO Abstraction library example
- IOA I2C/Wire abstraction that works Across Arduino and mbed
- Rotary encoder with non-polling (interrupt based) switches from PCF8574
- IoAbstraction: Using a matrix keyboard / keypad
- Arduino Button presses that are handled like events
- Liquid Crystal fork example using IO Abstraction library - examples
- EEPROM implementations that are seamless between 8 and 32 bit
- Simple Test - unit test framework for Arduino and mbed
- Arduino text utilities in IoAbstraction
- Arduino logging using io-logging
- IoAbstraction - Cross platform build support
- Using Arduino Pins and Io Expanders at the same time
- Working with Analog joysticks in IoAbstraction
- Touch screen support that works on all Arduino and mbed boards
- Working with Analog input events in IoAbstraction
You'll also find me on: