Items of type submenu can hold another list of menu items; which are presented as children of this menu item. Depending on the renderer you are using, this will display similar to the main menu when selected. BackMenuItem is silently added during code generation, it is needed to provide the user a way to leave the submenu back to the main menu. It has no configuration and will automatically display as [Back..], and when pressed the parent menu will be displayed.
Class Types for SubMenuItem and BackMenuItem
- Type:
SubMenuItemandBackMenuItemin RuntimeMenuItem.h, default callback typebackSubItemRenderFn - Enum returned by
getMenuType()is MENUTYPE_SUB_VALUE - This item is based on RuntimeMenuItem
- Information applicable to all menu items
Creating a sub menu in the designer
From the add item dialog choose SubMenu item, once created a new entry will be present in the tree. SubMenus are created under the nearest submenu, be that ROOT, or another submenu. In the designer, the BackMenu is not shown but is created automatically during code generation. Be aware that by default menu structures should not exceed 4 levels deep (including Root). See increasing menu depth further down.
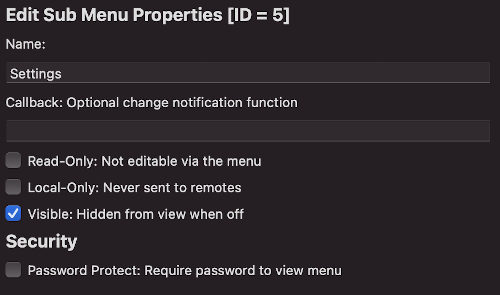
SubMenu editor in the UI
Accessing SubMenuItem from code
You can get the first child of this submenu as follows, remember from the all menu items page that the other items will accessed via the next property of each item:
MenuItem* getChild();
Creating a submenu item from the CLI
Submenu items are slightly different to other items in the EMF file. They must appear BEFORE the first reference to them. To create a submenu item from the CLI here is a template command (options in square brackets are optional):
tcmenu create-item --parent 0 --type submenu --name SubmenuName [--localonly --readonly --hide]
The structure of a submenu item in the EMF file is as follows, but don’t forget it must come before anything that references it:
{
  "parentId": 0,
  "type": "subMenu",
  "item": {
    "secured": false,
    "name": "SubmenuName",
    "variableName": "SubmenuName",
    "id": 7,
    "eepromAddress": 0,
    "readOnly": false,
    "localOnly": false,
    "visible": true,
    "staticDataInRAM": false
  }
}
Creating a SubMenuItem manually
We strongly recommend that you add submenus using the designer, they are quite complex to create manually. Should you need to create one manually, this is the procedure. First, you must create a back item and that must be the first child item in the sub menu, then you create the submenu itself:
const PROGMEM SubMenuInfo minfoExtras = { "Extras", subId, subEEPROMLocation, 0, NO_CALLBACK };
BackMenuItem menuBackExtras(&minfoExtras, nextChildItemPtr, INFO_LOCATION_PGM);
SubMenuItem menuExtras(&minfoExtras, firstChildItemPtr, nextItemPtr, [bool isInfoProgmem=true]);
At this point menuSubBackItem is the first child of the new submenu, and you would add menuSubItem at an appropriate point in your menu structure. You can also use a custom rendering function instead of RENDERING_CALLBACK_NAME_INVOKE should you need to manage the name in a custom way.
Increasing menu depth
Some parts of the code base do not use regular function based recursion, instead they use an internal queue. To save memory on the device this is limited to 4 items in depth. However, you can redefine MAX_MENU_DEPTH to any value at the cost of a little memory.
Other pages within this category
- Working with action items - ActionMenuItems
- Working with boolean values - BooleanMenuItems
- Working with fixed choices - EnumMenuItems
- Working with floating-point values - FloatMenuItems
- Working with large numbers - EditableLargeNumberMenuItem
- Working with lists of data - ListRuntimeMenuItem
- Working with numeric values - AnalogMenuItem
- Working with RGB color choice items - Rgb32MenuItem
- Working with scroll choice items - ScrollChoiceMenuItem
- Working with sub-menus - SubMenuItems
- Working with text, date, time and IP address items -
- Detailed description of MenuInfo based menu items
- Detailed description of RuntimeMenuItem
You'll also find me on: