In this guide we show how to use the U8G2 library to renderer menu items to an OLED unit with tcMenu. This rendering driver for U8G2 is built into the core menu designer download, meaning it’s available out of the box.
The U8G2 library supports a lot of different displays, with very different capabilities. This plugin concentrates on monochrome displays, mainly OLED that are supported by this library. It’s worth reading this guide fully so that you understand how we manage the various capabilities.
Before proceeding, you’ll need to make sure you’ve installed the U8G2 library (usually through library manager). Also, I’d recommend taking a read through the U8G2 library documentation if you’re not familiar with the library already. We’ll also assume you’ve got a menu structure already prepared in the menu designer UI.
Related documentation:
Configuring U8G2 rendering for your display
First, ensure your menu structure is saved and then choose Code -> Generate Code from the menu. Once the code generation dialog appears, you can change the display renderer by clicking on the image to the left of the renderer.
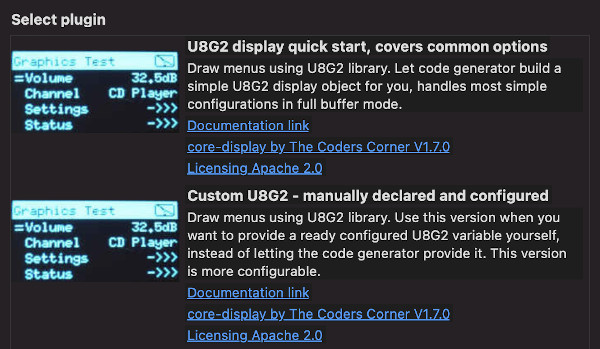
Image showing U8G2 renderer choice
There are two possible ways to work with U8G2, firstly you can use the quick start option, where the code generator will create the display variable and set it up on your behalf. This is less configurable, but quicker for common cases. We’ll refer to this as “Quick Start”.
Alternatively, you can use the manual declared mode, where you manually declare the display variable and initialise the display yourself during setup, before the call to setupMenu. We’ll refer to this as “Manual Configuration”.
Quick Start
When you use the quick start option, the code generator will create the display variable and initialise the display on your behalf. You will however be able to use the display in your own code, it will be exported using the variable name provided.
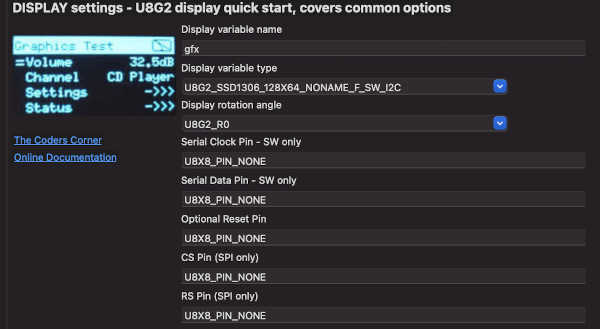
Image showing property choices for U8G2 rendering
Display variable property
This is the name of the variable that the code generator will create on your behalf, it will also be export for you too in the projectName_menu.h file.
Display variable type
This is a choice from common U8G2 display types, if you’re not familiar with these, you may need to run one the U8G2 packaged examples to work out which option is right. Not all options are supported by quick start, but most common ones are. Should you need to use one of the unsupported cases, use the manual configuration option instead.
Display rotation
You can preconfigure the display rotation, using the regular U8G2 rotation constants. Where R0 is no rotation.
Improve latency using yield (use with Hardware I2C only)
With this option selected, we replace the U8G2 data callback with one that calls yield every 16 bytes. In this case Wire is used as the I2C communication method, and taskManager.yieldForMicros() is called more frequently. This can make the application feel much faster with slower I2C.
For manually configured cases using the custom I2C plugin, you can also replace the data callback, we declare it in tcMenuU8g2.h. The definition is:
uint8_t u8g2_byte_with_yield(u8x8_t *u8x8, uint8_t msg, uint8_t arg_int, void *arg_ptr);
Serial Clock and Data pins - SW mode only
When using any display type option that runs in software mode (contains SW in type) then the clock and data pins need to be provided, for either the software SPI or I2C pins. Be aware that software mode can be much slower than hardware mode, and you probably shouldn’t use it for larger SPI displays.
Optional reset pin
If you need to configure a reset pin for your display, set it here, or default to U8X8_PIN_NONE or -1.
CS and DC/RS Chip Selection pin
Set these to the pins that will select the display (CS) and move between Register / Data selection. Only needed for SPI, set these to U8X8_PIN_NONE or -1 for I2C.
Updates per second
How many times the menu structure should be scanned for changes and redrawn if needed. TcMenu tries to minimise redraws where reasonably possible.
Manual Configuration
When you choose the manual configuration option, you need to create the display variable in your sketch, and make sure it is fully initialised before calling setupMenu in your sketch.
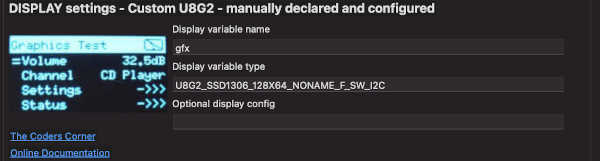
Image showing property choices for U8G2 rendering
Display variable property
As there are so many variations of display, you create the display variable in the sketch. This property is the name of the variable from your sketch. We’ll export it on your behalf so it can be used by the renderer.
Display Variable Type property
This is the type of the graphics variable that you created. It must exactly match the variable type used for the display driver in your sketch.
Updates per second
How many times the menu structure should be scanned for changes and redrawn if needed. TcMenu tries to minimise redraws where reasonably possible.
Notes for configuring U8G2 with common hardware
- If a few pixels on the right are not presenting properly then you probably have an SH1106 device, these are very common, use an SH1106 constructor instead of an SSD1306 one.
- If possible use the HW_I2C variant, and always use the full frame buffer. The yielding callback is only compatible with HW_I2C mode.
- ESP32 / ESP8266 with HW_I2C (using Wire library). Working and tested, both with and without the yielding enabled. We found it worked best when initialising wire before calling setupMenu, and leaving the SDA and SCL values at their default (U8X8_PIN_NONE). Once you call begin the SDA,SCL pins cannot be changed. You may need to try this yourself using the u8g2 hello world example first.
- Nano33BLE as above for ESP32 and ESP8266, we tested HW_I2C with and without the yielding callback.
Other pages within this category
- STM32/mbed LTDC Frame buffer menu touch driver
- Touch screen menu calibration
- Using SSD1306 to generate a Uno / low memory multi level OLED menu
- Embedded Java OpenJFX screen rendering for Raspberry PI
- XPT2046 / FT6206 touch screen input plugin
- TcMenu - Touch pad sensor input plugin
- TcMenu - Resistive touch screen input plugin
- TcMenu - Using Adafruit_GFX mbed to render menus
- TcMenu - Using U8G2 to render menus onto an OLED
- TcMenu - DfRobot input and display plugin
- TcMenu - Rotary encoder and switch input plugin
- TcMenu - Rendering menus to LCD using LiquidCrystalIO library
- TcMenu - Using Adafruit_GFX to render menus
- TcMenu - Using TFT_eSPI library to render menus
- Changes in graphics configurations for renderers
You'll also find me on: