SPI Serial Peripheral interface for Arduino tutorial
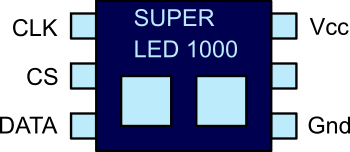
In this tutorial, I present a fictional SPI chip that we will use for the sake of example. This chip has two LED’s and controls them over SPI. It will help us to understand SPI with a real worked example. Following on we will build a real world circuit, using the SPI library, to see how easy it is to use SPI on Arduino.
Serial Peripheral Interface (SPI) Introduction
Serial communication allows less pins to be used to communicate information between two chips or boards, and also removes a whole class of timing issues that are associated with parallel communication. However, in order for serial communication to work, there needs to be a clock. Without the clock we would not know when a new bit was available on the data pin. New data arrives on each clock cycle, and the chip generally “shifts” that data into it’s internal registers.
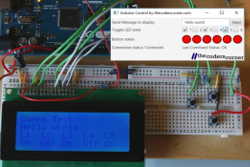
Arduino to PC communication using USB serial and Java
In this article, I present an example showing how to connect an Arduino device to your PC using USB serial and Java. USB serial is available on nearly all Arduino based boards. Further, there are serial interface Java libraries that can connect to an Arduino.
If you are unfamiliar with data communications in general, take a look a the introduction to data communications article; although it does not cover serial communication, it is still a good starting point for the unfamiliar.